
How to watermark photos in PowerPoint? It is possible to add a watermark to photo in PowerPoint. You can also get the answer to the question How to watermark photos in PowerPoint in the Microsoft office support forum. But that is not understandable to the new users. So in this tutorial, I am showing the procedure to add watermark to photo in PowerPoint with screenshots.
Of course, you can do anything to photo with Photoshop or Photoshop elements. If you want to buy Photoshop or Photoshop elements buy from adobe store. Before buying, check adobe offer page for current offers. If you already had Photoshop elements, you can also use Photoshop elements to watermark photos.
Every computer user must use Microsoft office. So you may have a Microsoft office. If you have Microsoft office, you must have PowerPoint. You can see the list of Microsoft office applications. If you had PowerPoint, you don’t have to use any other software to watermark photos.
How to watermark photos in PowerPoint?
Video Tutorial:
We provided this article in the form of a video tutorial for our reader’s convenience. If you are interested to read, you can skip the video and start reading.
Open PowerPoint. You can open it by going into Programs. Or right-click on the desktop and go to “New”. Click on “Microsoft Office PowerPoint presentation”.
Click on “Click to add first slide”.
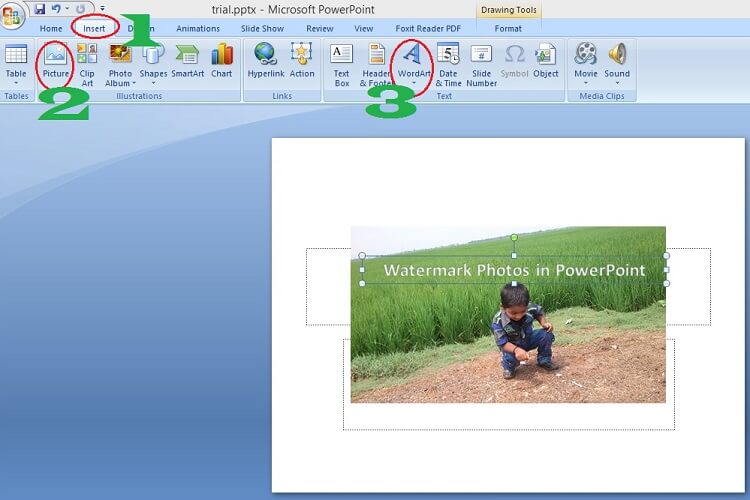
- Click “Insert” on the top menu.
- Click “Picture” as shown in the above screenshot. You will get a small window where you can browse your computer folders to select the photo. Select your photo.
- Now click “WordArt” and select any style from available options. Type your brand name or anything which has to be a watermark. Here I have written “Watermark photos in PowerPoint”.
Select your watermark word or sentence. Just click on the sentence to select and drag your mouse. You can see the “Format” tab in the top menu.

- Click on the “Format” tab in the top menu.
- Click on a small symbol right to “WordArt Styles” which shows that in the above screenshot. You will see the “Format text Effects” window.
- Select the first option which is “Text Fill”. Select any color from the right-side options.
- Adjust transparency to any percentage, you will see a change in your watermark. Here I have adjusted to 47%. It may be different according to your picture color.
- Select the second option in the “Format text Effects” window which is “Text Outline”. Select any color. Adjust transparency to your required percentage. Now you will see a good-looking watermark.
You can also try the remaining options from the “Format text Effects” window. You can use 3-D Rotation for a better look. Now your watermark is ready. You need to save this as a picture. For that follow the below procedure.
- Click on the watermark sentence to select a watermark.
- Hold the Ctrl button and click on the photo to select photos. Now you have selected all elements from your work.
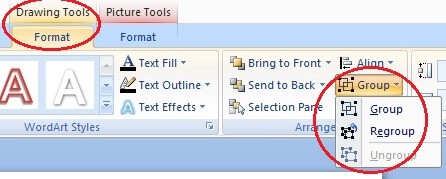
Click on “Group”. You will see the “Format” tab under “Drawing Tools”. You will see three options. Select the first one which is “Group”. Everything is shown in the above screenshot.
Right-click on the picture and click on “Save as Picture”. You can save it in any format. It is better to save in jpg or png. Now your photo is ready with a watermark.
Thanks for reading my tutorial about How to watermark photos in PowerPoint. If you like it, do me favor by sharing it with your friends and follow WhatVwant on Facebook and Twitter for more tips. Subscribe to whatVwant channel on YouTube for regular updates.
Hi, learned very easily. Thanks. But I got a doubt, in my saved picture, white background is seen. How can I remove the white background ? Please help
When you save image as JPEG or JPG you will see a white background.
When you save image as PNG with transparent background, you will not see the white background.