
Don’t want to lose data on your Android at any cost? Want to restore and backup data on Android? You can easily backup android phone applications and contacts. Your phone memory has contacts and applications. If you format your device, you may lose them. Your SD card may contain photos and videos. So there is less chance to lose them. In this article, I am going to show you how to backup android phone contacts and applications.
If you restore your mobile to factory settings, you must lose complete data. In that case, you must take a backup of your android phone. You can also read my article about how to increase the internal memory of the Android phone. It also gives you a way to restore factory settings in Android.
- Read: How to recover deleted photos from android
- How to restore deleted files from PC, USB & memory card
What is Backup and Restore of Android phone?
Backup and Restore is the process of creating the copies of information that is stored in our Android phone ( such as contacts, media, apps, Gmail settings, Google Calendars events and settings, etc) and store all those information in some other places like Google Drive, One Drive, One Note, or any other Android phone. And again getting that stored information whenever you needed.
Why we need to Backup and Restore Android phones?
Once you back up the information then you don’t need to worry about the information loss in any situation like factory reset, phones break, loss of your android, or any loss due to a virus attack. You can restore all that information from your cloud account (Google Drive, one drive, etc) to any android device which you wish or to the same android.
Methods to Backup Android Phone Completely and Restore
Generally, we can divide the Android backup and storage into two categories based upon the method that we follow. Those are
- Backup and Restore of Android using Google Drive
- Backup and Restore of Android using some Android applications
These two methods will help you to backup and restore Android completely like apps, contacts, calendar, etc.,
Let us see the different methods in two categories as follows.
1. How to Backup Android Phone and Restore using Google Drive
Google Drive is a cloud-based storage solution that allows us to save files online and access them anywhere from any smartphone, computer, tablet.
We can back up our Android storage files such as contacts, media, apps, and other files of our Android to cloud storage by using Google Drive. To backup and restore your Android information using Google Drive follow the steps below.
1.1. Backup Android using Google Drive
Step 1: Open settings in your Android Phone
Open the settings of your Android phone where all types of android settings are available.
Step 2: Click on System option
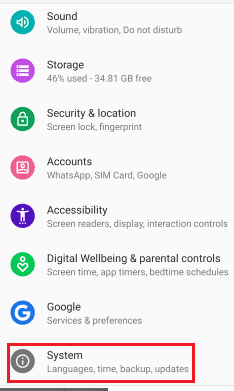
Now in the settings, you can see many types of settings regarding your android phone. At the bottom of the screen, you can see the option “System” where all the system related settings will be found. Click on that System option.
Step 3: Click on Backup option from system settings
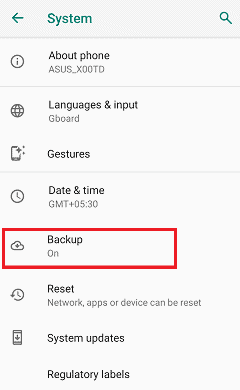
When you click on the system, then the screen will open with different system settings as shown in the above image. On that screen, you can see the Backup option also. Click on the Backup option.
Step 4: Enable the backup to Google Drive option and set account for backup
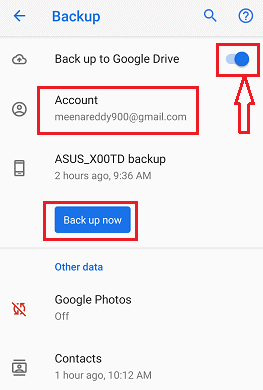
Now the backup settings will be open as shown in the above image. You must enable the Backup to Google Drive option in order to backup your Android. And also, you need to set the account to which you want to backup your Android.
Finally, the settings are made, now click on the Backup Now option. Then it warns that the backup of Android will lead to higher data consumption along with cancel and Backup now option. Click on the Backup now option.
With this, your Android phone is back up and all the information will be store in your Google Drive which you can connect anywhere with mobile, tablet, or computer to restore your information. This is the backup process of Android using Google Drive.
1.2. Restore Android using Google Drive
Let us see how to restore files from the Google Drive in step-wise manner.
Step 1: Open Google Drive Menu and click on Backups
Once you backup your Android storage such as contacts, media, apps, and other information to Google Drive, you can easily get them back ( restore ) by simply connecting with the internet using a phone, tablet, or computer.
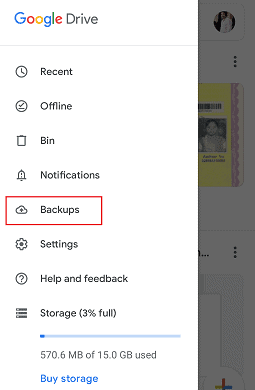
To restore, open the Google Drive app, click on the menu (three horizontal lines at the top right corner of the screen) option. In the menu, you can see different options regarding Google Drive as shown in the above image. Click on the Backups option.
Step 2: Select the file to restore
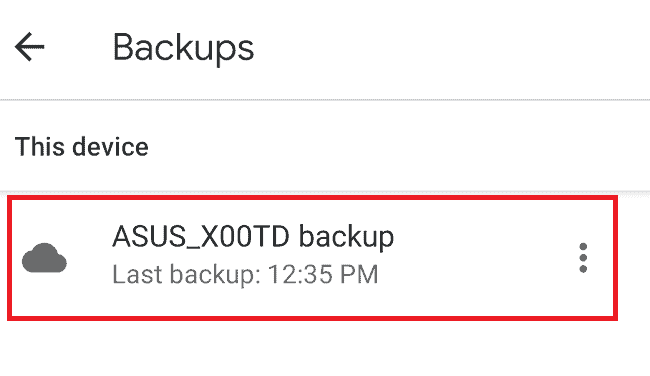
In the backups list, selects the backup information file which you want to restore.
This is the backup and restore process using Google Drive.
- You may like: How to Backup Mac to external hard drive with Time Machine
- How to Backup WhatsApp messages with Google Drive
Now we will discuss what are the apps that support the backup and restore process of Android. Let us see what are the different applications that support the android backup and restore as follows.
2. How to backup & Restore Android using the Super Backup & Restore app?
The Super Backup & Restore app is an Android app that is designed to support the backup and restore Android storage. Follow the steps below to backup Android and restore using this super backup & Restore app.
2.1. Backup Android using Super backup & Restore app
Step 1: Install the Super Backup & Restore app from Google Play Store

First of all, you need to install the Super Backup & Restore app from the Google store. It’s a free app for android.
Step 2: Give permission to the app
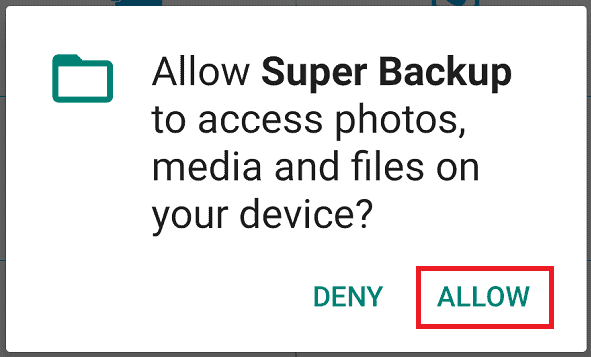
When you launch the app, it asks you to give permissions to access the media and other files of your Android. Click on the Allow option which is at the bottom of the dialogue box.
Step 3: Select the category which you want to backup
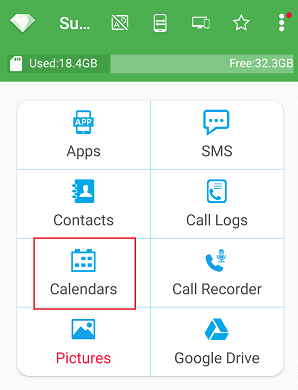
You can see different categories for backup such as Apps, SMS, Contacts, Call logs, and Calenders, etc. Select the category which you want to backup. Then again it asks you to give access to particular files, click on the Allow option.
Step 4: Select the backup type and file name
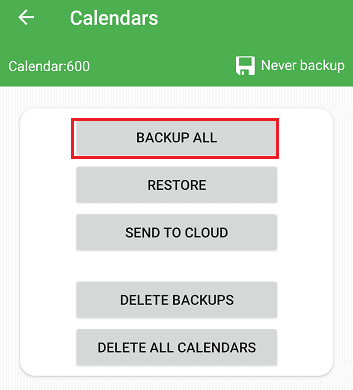
You can select any one of the methods to backup either to backup all, restore or send to the cloud. Click on the Backup All.
Then you need to give a name for your backup file. Give any name to your backup file which you want.
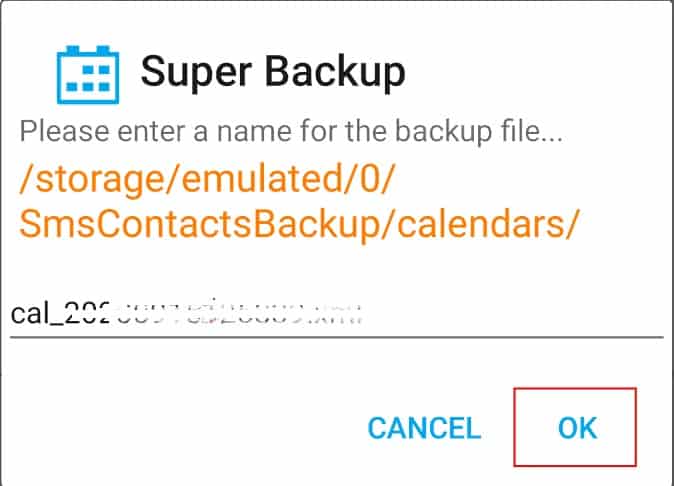
When you click on it, all the calendar information will be backup successfully.
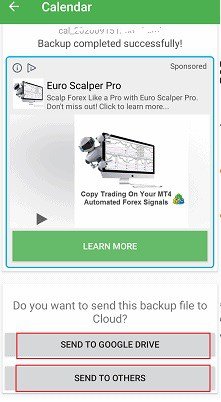
Step 5: Send backup file to Drive or Others
Once the backup is successfully completed, then you can either send it to Google Drive or others. Select any one as you wish. Send them to store in the cloud.
This is the calendar backup procedure for android, you can select other categories ( Such as Apps, SMS, Contacts, Call logs, Call Recorder, Pictures, Google Drive) also like this.
2.2. Restore Android using Super backup & Restore app
Step 1: Click on Restore option
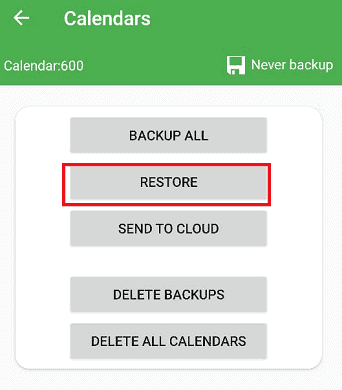
Once the backup is completed, just click came to the previous step where you have option backup all, restore. There click on the Restore option.
Step 2: Select the file which you want to Restore
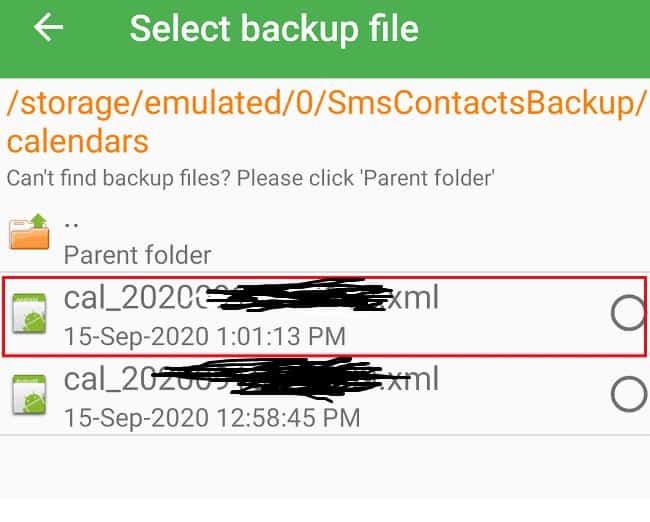
Now in the restore section, you can restore any backup file. Just select the file then the file will be restored automatically.
This is the Backup and Restore procedure using the Super backup app.
3. How to Backup and Restore Android using All Backup & Restore app?
All Backup & Restore is one more app that supports the backup and restores of your Android phone. Let us see how to proceed with this app.
3.1. How do I Backup Android phone using the All Backup & Restore app
Step 1: Install the All Backup & Restore app from Google
The first thing you need to do is install the All backup& restore app from the Google Play Store. And then launch it on your Android phone.
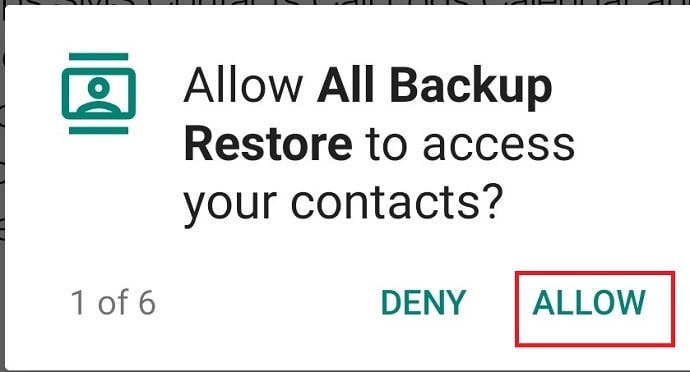
Step 2: Give permission to app to access your media and other files
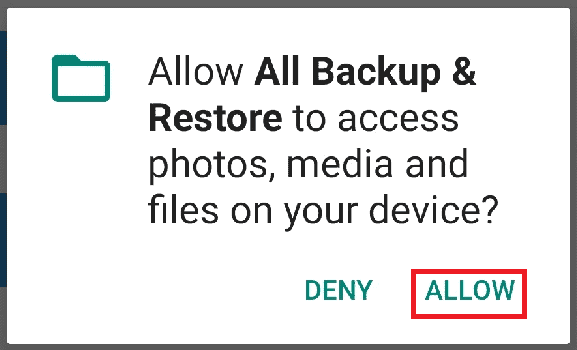
When you launch the app, it asks you permission to access your media files, calendar, contacts, etc. Click on the allow option which is placed at the bottom of the dialogue box.
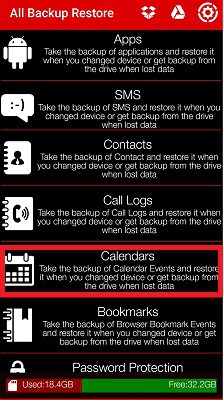
Step 3: Select the information which you want to backup

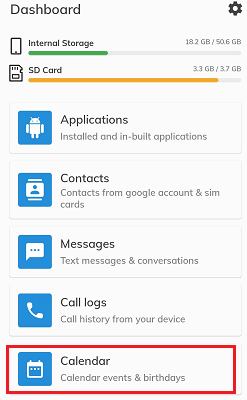
When you give permission to access then the home screen will open as shown in the above image. On that screen, you can see the categories of which information you want to backup. Select the option which you want. Here I am selecting the calendar to backup all my calendar events.
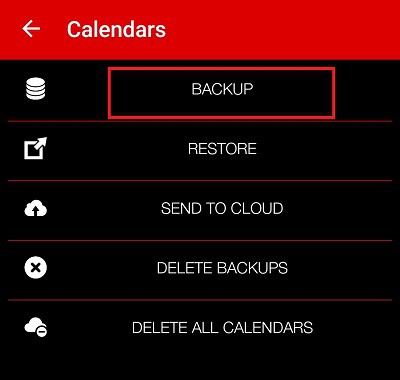
Step 4: Select the backup option from the list of events
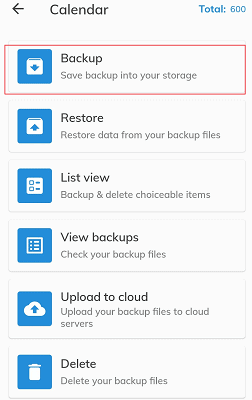
When you select a particular category, then the events(options) related to that category will be shown on the screen. Those events are Backup, Restore, List view, View backups, Upload to the cloud, Delete. Here our requirement is to backup. So click on the backup option.
Step 5: Give name to your backup file
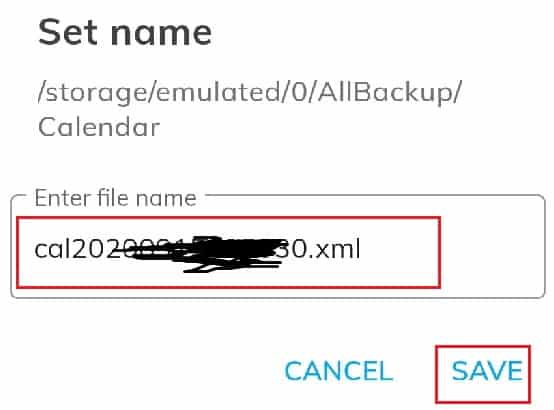
Now you need to give a name to the file which you want to backup. By default, a name will be shown along with the category which you selected as shown in the figure. You can also change that file name by clicking on it, and then enter a new name to the file. Now, click on the Save option which is placed at the bottom of the dialogue box.
With this, the backup process is completed. If you want you can upload it to drive.
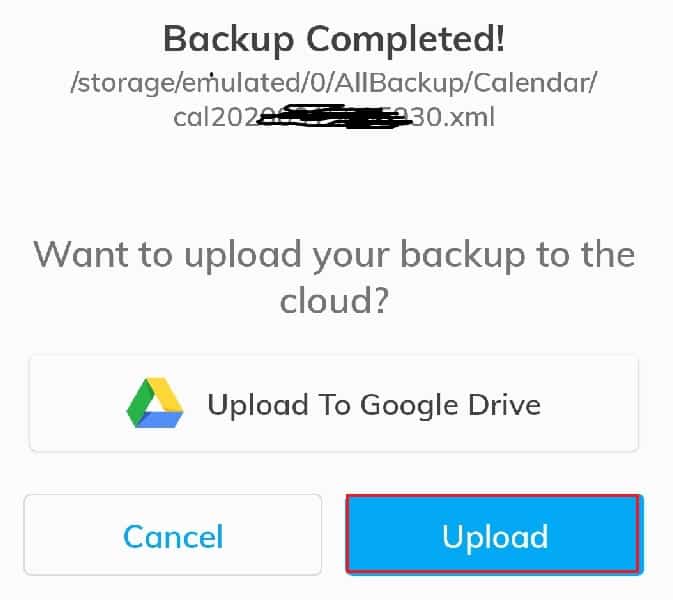
This is the backup process step-wise procedure.
3.2. Restore Android using all Backup & Restore App
The Restoration process is very simple and easy using the All backup & Restore app. It takes very little time to restore. Let us see how to restore using this app.
Step 1: Click on the category which you want to restore
When you open the app, you can see different categories either for backup or restoration. Select one category from the available categories which you want to restore. Here, I am again selecting the calendar category which I used to backup previously.
Step 2: Select the Restore option
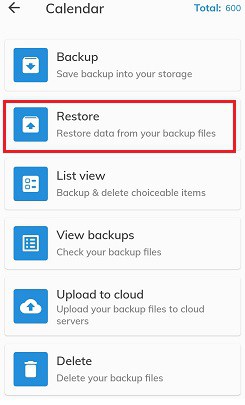
When you select a particular category, then the events related to that category will be shown on the screen. Those events are Backup, Restore, List view, View backups, Upload to the cloud, Delete. Here our requirement is to restore the file of information. So click on the Restore option.
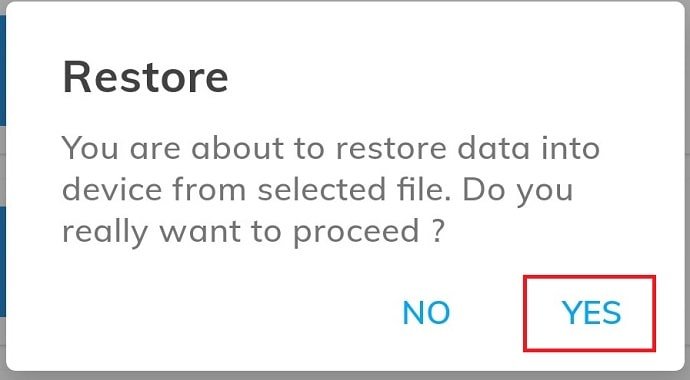
Step 3: Select the backup file which you want to restore
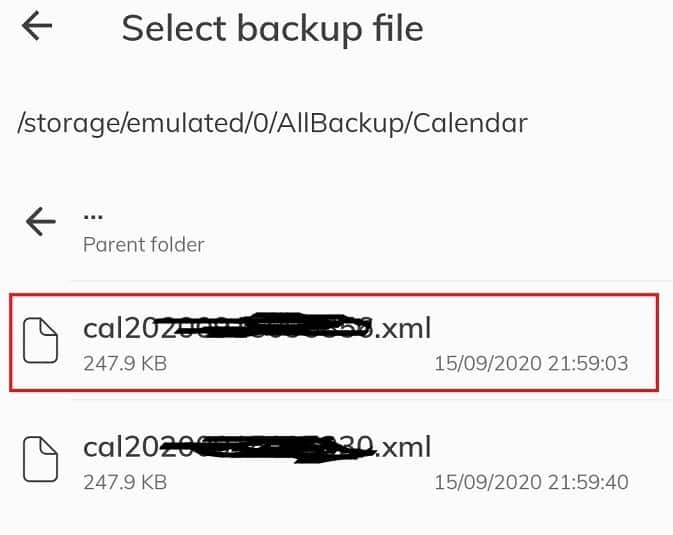
Now, you need to select anyone backup file from the available files to restore.
Now it asks you to confirm your decision on Restore procedure. Click on the Yes option as shown in the image.
Wait for a while, until the restoration process is completed. The restoration time depending on the number of files that you want to restore, the size of each file, and your internet speed.
This is the step-wise procedure for backup and restoration of Android using the All Backup & Restore app.
- You may like: How to Restore Computer to Earlier date in Windows 7,8,8.1&10
- How to Export, Import, Backup Firefox bookmarks & Restore
- How to Backup internet explorer & restore with backrex
4. How to Backup and Restore Android using the All Backup Restore app?
4.1. Backup process
Follow the below steps to backup Android using the All Backup Restore app.
Step 1: Install the All Backup Restore app from Google

The first thing you need to do is install the All Backup Restore app from the Google Play Store. And then launch it on your Android phone by clicking on it.
Step 2: Give permission to app
When you launch the app, it asks you permission to access your media files, other files of your Android. Click on the allow option which is placed at the bottom of the dialogue box.
Step 3: Select the category to backup
When you give permission to access then the home screen will open as shown in the above image. On that screen, you can see the categories which information you want to backup. Select the option which you want.
Step 4: Select the backup option from the available options
When you select a particular category, then the options related to that category will be shown on the screen. Those options are Backup, Restore, Send to the cloud, Delete backups, etc. Here we need to back up the information of Android phones, so click on the backup option.
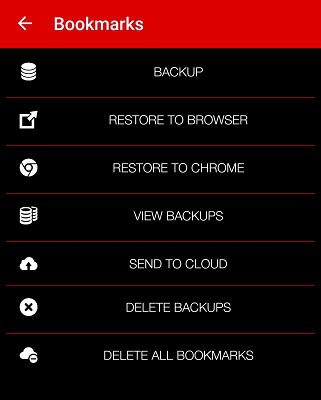
Note: Here the list of options will be changed based upon the category that you selected. If you select the bookmarks category, then the options will be Backup, Restore to Browser, Restore to Chrome, View backups, Send to Cloud, Delete Backup, Delete All Bookmarks. Like this, the options will be changed based on the category. Whatever the category it may be but our one and only intention are to backup which is placed at the top of all options in all categories. So click on the backup option in any category.
Step 5: Give name to backup file
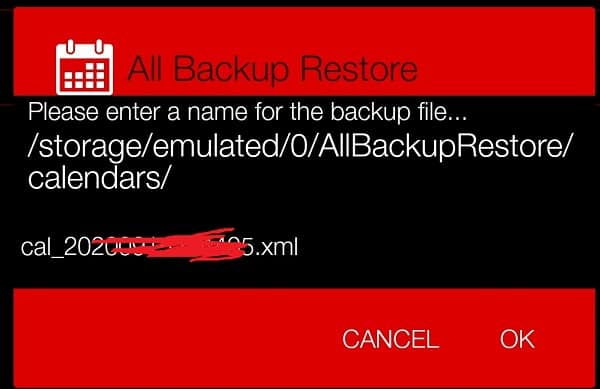
Now you need to give a specific name to your backup file so that it’s easy to recognize a particular backup file when multiple backup files are available. Type the name and then click on OK. By default, there is always suggest a name as shown in the above image.
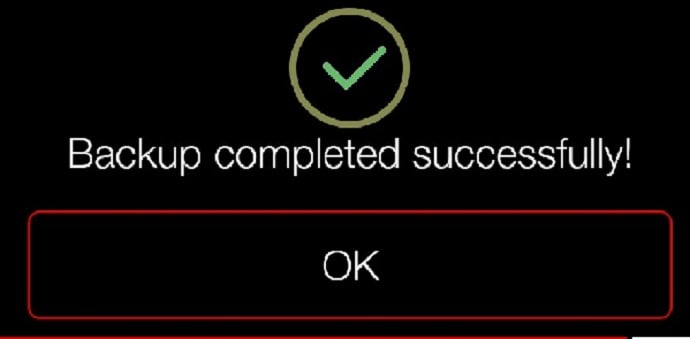
With this step, the backup process is completed.
4.2. Restore process
In the previous, we have seen the backup process. Let us see the restoration process in this section.
Here the step 3 process in the previous section will be the same in this section ( means you need to select the category which you want to restore). So let us discuss the process from the next step onwards.
Step 1: Select the Restore option from the list of options

When you select the category, you need to select the thing which you want. Here our requirement in this section is Restore. So click on the Restore option as shown in the above image.
Step 2: Select the backup file to Restore
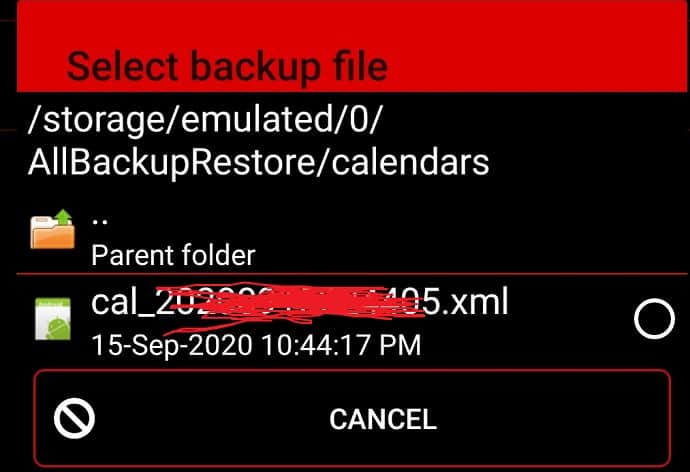
Now, select the backup file which you want to restore using this All Backup Restore app.
Here the selection means clicking on the backup file. If the tick mark is placed in the circle symbol then your backup file is selected.
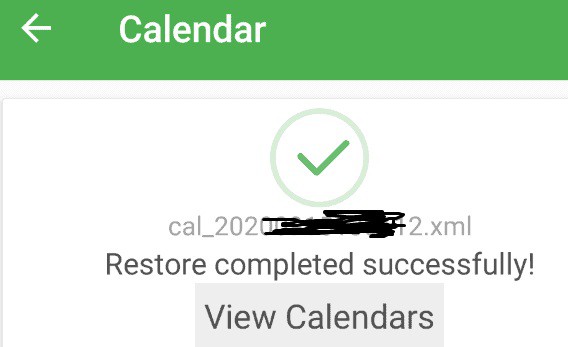
Wait for a while until the restoration is completed.
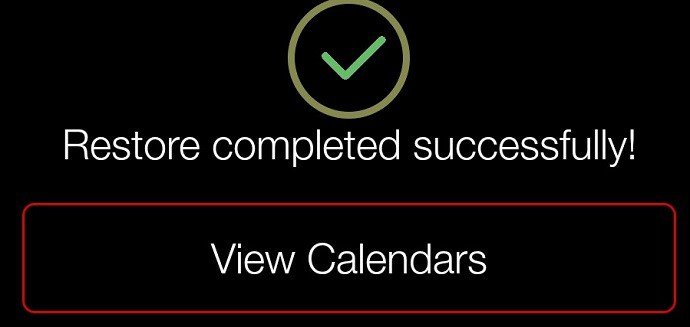
Once the restore process is completed, you can view them by clicking on the view option. Here we restore the calendars so the name is displayed as View Calendars. If you select the contacts then the name will be displayed as View Contacts.
This is the step-wise procedure to backup and restores using the All Backup Restore app.
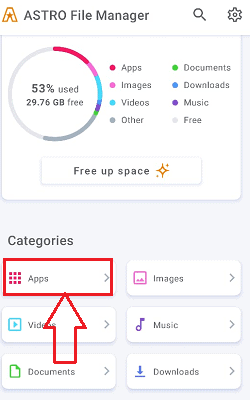
5. How Do I Backup Android Phone Apps using ASTRO File Manager & Storage Organizer?
To take applications backup, you need to install ASTRO File Manager & Storage Organizer. It is a free multipurpose app. Along with the file manager, it also gives the option to backup applications and to restore them. I think this is the best backup app for Android. Instead of using two applications for two purposes, it is better to use one application for two purposes. So that we can also save internal memory.
5.1. Backup Android apps with ASTRO File Manager & Storage Organizer
To take the backup of applications with ASTRO File Manager & Storage Organizer follow the below steps.
- Install ASTRO File Manager & Storage Organizer from the Google Play Store.
- Open the Astro file manager application.
- Slide to the right.
- Click on “Application Manager“. You will see the screen shown in the screenshot.
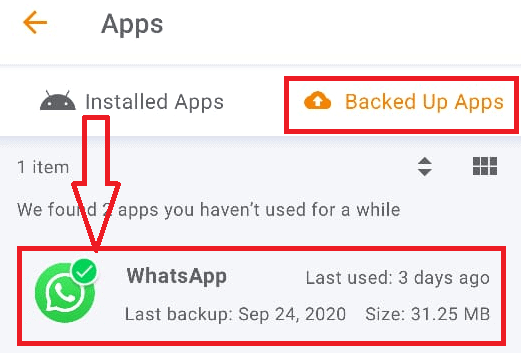
- It has two options at the top, “Installed Apps” and “Backed Up Apps”.
- Select “Installed Apps” at the top.
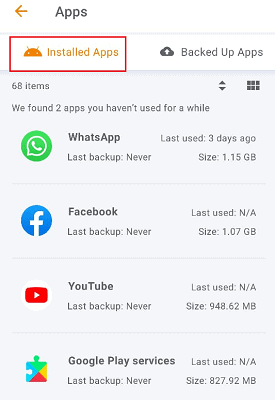
- Click on any application. You can see two options, and those are “Backup” and “Uninstall”.
- Click on Backup.
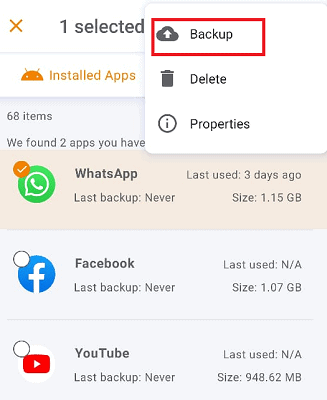
- Now you will get your application back up. You can see backed up application under “Backed Up Apps”.
Select each application one by one and click on backup. Like this, you can backup Android phone applications.
5.2. How to Restore Android phone applications
To restore applications with “Astro file manager” follow below steps.
- Open the Astro file manager application.
- Slide to the right.
- Click on the Application Manager.
- Click on “Backed up apps” at the top.

- Click on any application. You can see options to Delete and Install.
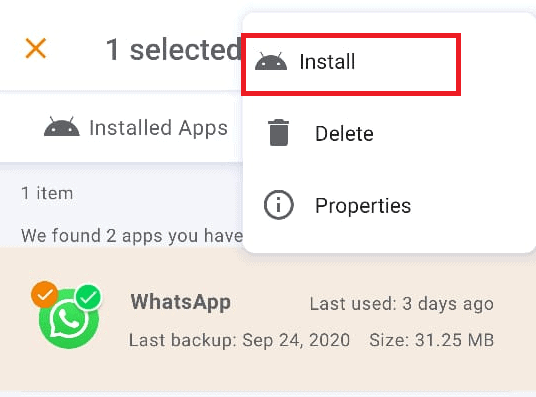
- Click on Install to reinstall backed up application.
6. How Can I backup My Contacts on Android?
You can backup Android phone contacts without using any apps by following the below steps.
6.1. Backup Android phone contacts
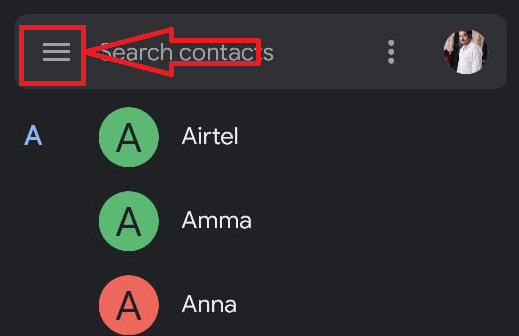
- Go to the contacts in your phone.
- Click on the options menu.
- Go to Settings.

- Go to Contacts.
- Select Import/Export. You will see many options. Click on the Export option.
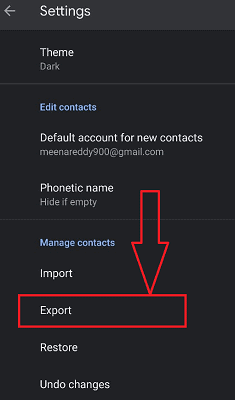
- Select Export to SD card or Export to device storage.

Now you have contacts backup.
6.2. How to Restore Android Phone contacts
- Go to Contacts.
- Click on the options menu.
- Go to Settings.
- Go to Contacts.
- Select Import/Export. Upto this, the steps are same as above backup method.
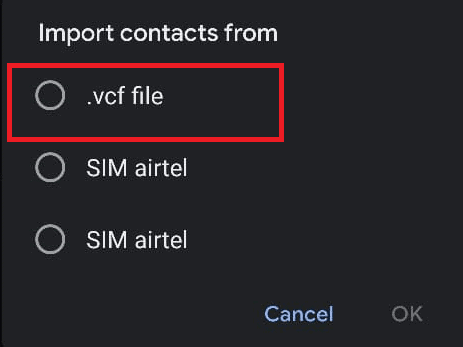
- Now click on the Import option.
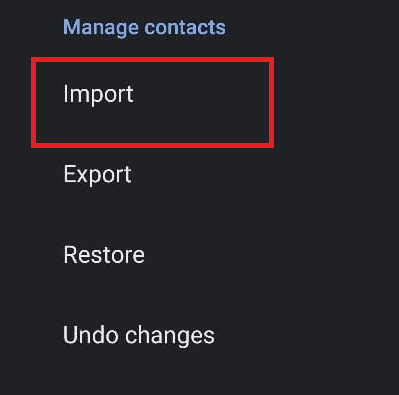
Select Import from SD card, if you had stored contacts in the SD card. Or select Import from device storage, if you had stored contacts in the device storage. After that, you may see different options on different mobiles. Just complete the remaining steps and restore contacts.
Conclusion
By reading this article, you came to know about taking applications and contacts backup. If you want to make the backup of entire Android files like photos, videos, documents, etc., you must use online backup services like iDrive (75% Discounted Link). You can also use Google drive to take the backup.
- You must read: Step by step guide to backup Android to Google Drive
- 4 Common Android problems and their solutions
If you like my tutorial how to Backup Android phone and restore. Please share it with your friends and follow WhatVwant on Facebook and Twitter. Subscribe to whatVwant channel on YouTube for regular updates.
How to Backup Android phone and Restore – FAQ
What will happened if we backup our Android Phones?
If you backup your Android then the information stored in your android phones then it will be creating some copies for future use whenever you needed.
Can I view my android backup without restore into another device?
Yes, it is possible. You can view the backup files of your android by clicking on the backups sections in your Google Drive.
Is Backup and Restore of Android will change from one phone to another?
Yes, the Backup and Restore of Android will change from Android to Android based on the versions.
Is it possible to backup the Android to PC?
Yes, it is possible. Once you click on the backup option, you can see different places to store that backup information. In those, a PC is also available as an external device that can hold the backup files of your Android.
What is the best backup and restore method among all the above methods?
Backup and Restore method that uses Google Drive is the best method among not only the above methods but also among any kind of Andriod Backup methods.