Want to know what are the things that you need to do before booting a USB? Do you need a bootable USB creator software? Want to know what are the methods to create a bootable USB?
In this post, you will find: Important things to take care of before starting the booting process, 8 free Bootable USB creator software, and 8 Methods to create a bootable USB, How to make your Pendrive normal (Non-Bootable), and many more.
Important things to take care of before starting the booting process
MBR vs GPT (which one to choose during USB booting)
If you came to this post after facing a boot error, you might have chosen the wrong one between MBR and GPT partition schemes.
90% of the Pendrive bootable process was unsuccessful because you didn’t know what are MBR and GPT. In simple words, these are partition scheme standards used for partition the hard disk of the computer.
If your pc has MBR supportable disk, then you must choose the MBR partition scheme on the software you’re using to make USB bootable. Else select GPT.
How to check if your pc disk supports MBR or GPT?
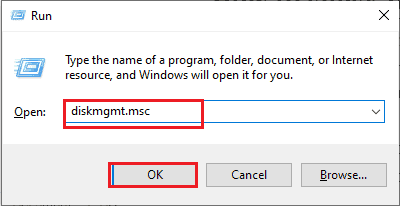
Step 1: Open disk management tool: by pressing windows key + R to open Run command.
Step 2: Type command diskmgmt.msc and hit enter.
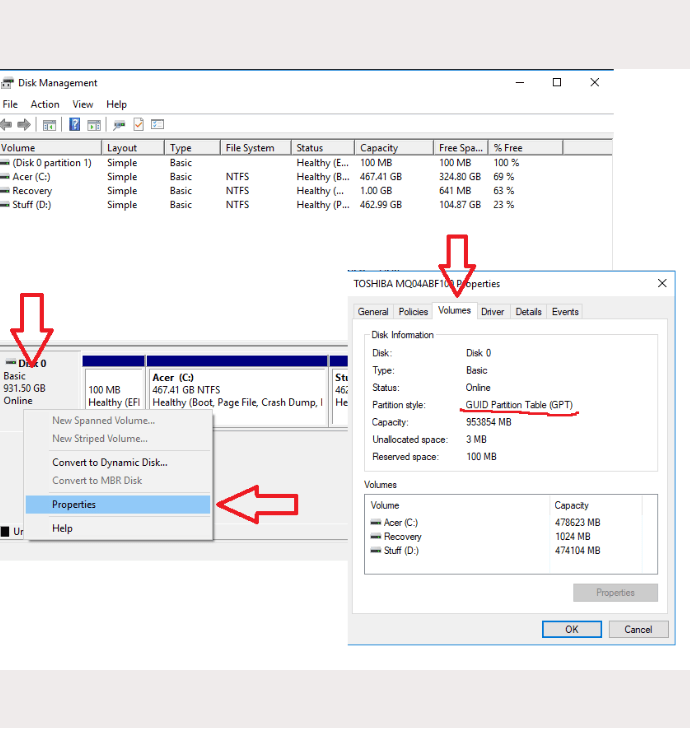
Step 3: Right-click on the disk you want to check and click on properties.
Step 4: Navigate to the volume tab; you will find partition style information.
FAT32 vs NTFS: (which one to choose during the booting process)
Another major factor responsible for unsuccessful booting is to choose the wrong file system. Decide based on the following parameters:
- If your operating system files have an individual file with having a size of more than 4 GB only then go for the NTFS file system.
- If you want to boot the operating system including mac or Linux and other applications, utilities, etc. on a USB drive, go for FAT32.
- FAT32 is compatible with all operating system and any other device in the world which has a USB port.
- FAT32 is the default file system. You should try FAT32 first, In case any error comes up go for NTFS.
USB Boot Prerequisite
- USB Pendrive of size more than the operating system.
- The operating system in iso file format.
- Bootable software
For this tutorial, I am using Sandisk 16 GB USB drive, Windows 10 iso image (4.15 GB), and GPT disk supportable laptop.
All methods mentioned below are totally free and tested.
The list has been sorted by the time consumed by the software to make Pendrive bootable. My Pc is Acer Nitro and holds 8 GB of RAM.
1. Using Rufus: Best Bootable USB creator
Rufus is the fastest free Bootable USB creator software available in the market which comes with a lot of advanced settings and customization. It is one of the popular software in the disk management software industry.
Rufus Features:
- It is free, open-source, and straightforward to work.
- We can also utilize it for flash BIOS, firmware, and run low-level utilities.
- Also, if we compare Rufus with other USB bootable software, this is the quickest in making a bootable USB drive.
- Rufus gives you advanced options, including creating the partition scheme file system and cluster size. These options are genuinely beneficial while making BIOS firmware or other low-level devices.
- Rufus additionally permits you to check the USB drive for any bad blocks
How to create a bootable USB by using Rufus?
Time took: 9 minutes.
- After download, open the portable rufus.exe file.
- Choose your USB from the device dropdown menu.
- Choose the iso file by clicking the boot selection dropdown menu and browse the image file through the select button.
- Choose the partition scheme according to your pc hard disk.
- Under the volume label, you can give a name of your choice to bootable Pendrive.
- Change file system from fat32 to NTFS (only if you are booting windows)
- Leave cluster size to its default file.
- Lastly, hit on the start button to initiate the booting process.

Related: How to repair USB drive
2. Using Diskpart and command prompt
The method of creating bootable USB in windows by diskpart and cmd is the most legit and trusted way officially suggested by Microsoft.
Diskpart Features:
- 1. Recommend way of making Pendrive bootable by Microsoft.
- 2. Secured. Unlike third-party software.
How to create a bootable USB by using Diskpart and command prompt?
Video Tutorial
Well, we will recommend a diskpart video tutorial to avoid any mistakes during the insertion of commands. But if you do not have time, you can continue with the steps written just after the video.
In this section, we are going to show you how to create a bootable USB by using Diskpart – command prompt. Before moving further to the cmd part make sure to plug the USB drive into the PC and also mount the windows disk image iso image using windows explorer
Total Time: 10 minutes
Step 1: Run CMD as Admin
Run cmd as an administrator and follow these commands. (Please ignore “”)
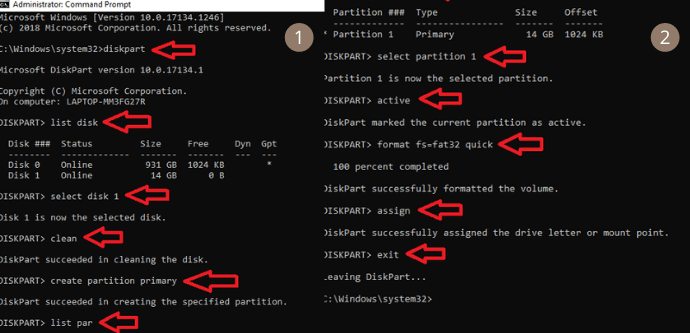
Step 2: Diskpart
The first command is “diskpart.”
Step 3: list disk
The second command to insert is “list disk”. Now you will see all the internal and external disks connected to your computer. Keep in mind the drive number of your USB. Example disk 1
Step 4: Select command
Next command is “select [n]” where n is the drive number of your USB. Example “select 1”
Step 5: Clean command
Your USB disk has been selected. Insert command “clean” to wipe out everything from the flash drive.
Step 6: Create partition command
Insert next command “create partition primary.”
Step 7: list par command
Insert the following command “list par” to show the available partitions.
Step 8: Select partition and active command
Select the partition by typing the command “select partition 1” and click enter. Inject another command “active” and press enter.
Step 9: Formatting command
Now the formatting command will be in action. Insert command “format fs=fat32 quick”.
Step 10: Assign command
As soon as the formatting process is done. Insert command “assign” to give a drive letter to your USB.
Step 11: Exit command
Insert last command “exit” to leave out the diskpart. But don’t close cmd window yet.
Step 12: xcopy command
The final step to insert xcopy command to copy all files from the mounted window iso disk image to the USB drive. The syntax for an xcopy command is “xcopy G:\*.* /s/e/f Z:\” WHERE G is the drive letter of the mounted disk image and Z is for the USB drive.
Supply:
- Rufus
- Diskpart and command prompt
- RMPrepUSB
- WinUSB
- Universal USB Installer
- UNetbootin
- YUMI – Multiboot USB Creator
- Win32Disk Imager
Tools:
- Diskpart and command prompt
Materials: software
3. Using RMPrepUSB: Bootable USB creator for Windows
RMPrepUSB can produce multi-boot drives and providing features of multiple image support, various boot loader support and QEMU Emulator which can rarely seen in the free Pendrive bootable software. However, it is hard to use software for beginners. Consider checking their website for help and guide.
RMPrepUSB Features:
- It is a highly customizable USB bootable software for windows.
- The software has the capability of creating multi-boot drives, supporting various image formats and customizing the bootloader options.
- Not only operating systems, but you can also install various types of bootloaders into the USB with this software. For example, grub4dos, syslinux, bootmbr etc.
- The software has QEMU Emulator that allows you to verify if the bootable Pendrive you just create is functional or not.
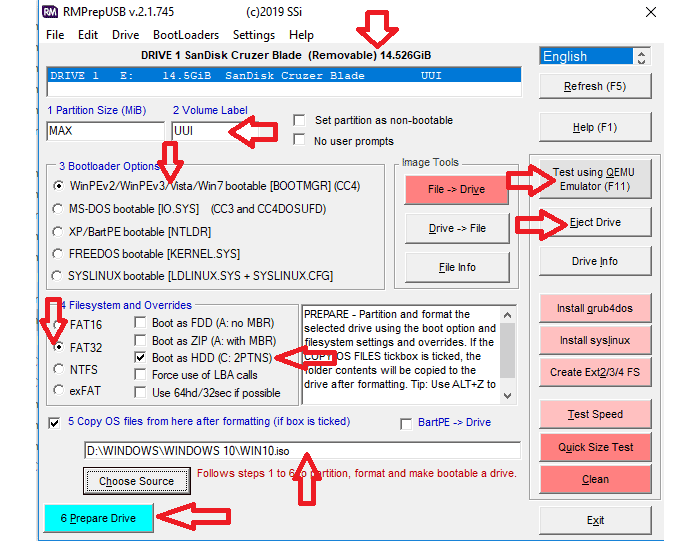
How to create a bootable SD card by using RMPrepUSB?
Time took: 11 minutes.
- After installing, open up the remprep.exe file, you will notice a lot of options appear on the interface. I recommend following in order.
- Insert your USB into the PC, and if it inserts correctly, you will see your USB name on the top bar displayed on the software.
- Leave the partition size to the MAX
- Give any name under the volume label textbox. For example my windows.
- Under boot loader options choose WinPE if you’re willing to install windows based operating system on USB. For Linux-based OS choose syslinux option.
- Do not make any changes to the options display under image tools.
- Under the file system section, choose FAT32 or NTFS and leave option: “Boot as HDD” unchanged.
- Next, move down to option 5 and tick on the checkbox. After this click on choose source and you will see a popup dialogue box opened up. Click on No if you have the operating system stored in the iso file.
- You almost reach to end, Just click on option 6 “prepare drive”. It will first format your USB drive and then start the booting process. As soon as the booting process finishes, you will be notified.
- To test the booting process has completed successfully or not. Click on the “test using the QEMU emulator” button.
- After selecting the emulator option, you will notice two dialogue boxes. First is for choosing the size for the virtual disk. Insert 1 under this option and the Second is for allocating ram to the virtual disk. If your pc has 8 GB ram, insert 2000 MB, else 1000 MB works fine.
- If everything goes fine, the installation of the operating system will be displayed on the cmd window.
- Close the cmd and click on Eject drive button to finish the process.
Related: How to partition SD card and flash drive
4. Using WinUSB
WinUSB is trending among the Pendrive bootable software. It can make USB bootable without formatting, which helps it to stands out in the market.
WinUSB Features:
- 1. Prior formatting doesn’t require.
- 2. Easy to use interface.
- 3. Multi-boot advantage.
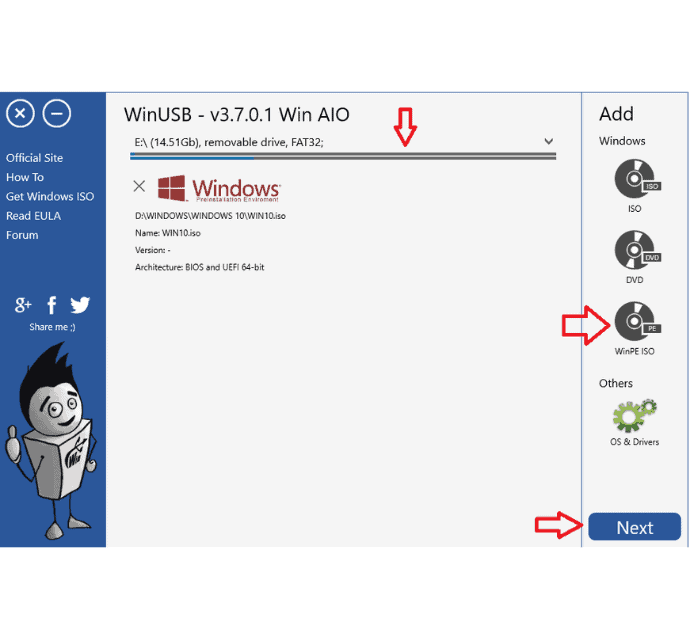
How to create a bootable USB by using WinUSB?
Time took: 13 minutes
- Download WinUSB and open up the software.
- Insert USB drive
- Select your USB from the “plug and select the USB drive “dropdown menu.
- Click on WinPE iso icon from the right menu bar and choose your operating system iso file. Click next.
- The software asks you to enter the name of the selected USB. Give it any name you want. It doesn’t matter.
- Hit OK and click Next.
- Choose the file system.
- Click Yes to start the booting.
Related: How to enable secure boot in your PC
5. Using Universal USB Installer
Universal USB Installer is a Windows bootable USB application that lets you make practically any sort of bootable USB media including Linux or Windows, antivirus drives, security, and penetration testing drives, or other low-level bootable drives.
Universal USB Installer Features:
- By performing the booting process with this software, there are very less to none chances of user mistakes. Because it automatically set configuration settings based on the operating system you choose from the dropdown menu.
- The other gold feature of universal USB installer is allowing the user to boot Pendrive with the persistent storage feature. By setting the size of persistent storage, you can back, store and access persistence data including system settings, application settings in the USB drive.
- Note down that this feature is only available when you boot Linux OS on a flash drive.
How to create a bootable USB by using Universal USB installer?
Time took: 14 minutes
- After download, open the software and choose the desired type of operating system from the dropdown menu.
- Select the iso image file.
- Select the USB drive from step 3.
- Select persistent storage (if available)
- Click on create and wait.

Related: How to recover deleted files from USB
6. Using UNetbootin
UNetbootin is a robust Pendrive bootable software specially designed to boot Linux based operating system over USB.
UNetbootin Features:
- Only able to boot Linux based operating systems.
- Available for windows, mac and Linux.
- The main advantage of using this software is that if a user doesn’t have an iso image on their pc, then It allows a user to download it within the software itself.
How to create a bootable USB by using UNetbootin?
Time took: 14 minutes
- Choose Linux distribution from the dropdown menu.
- Make sure to check the disk image option and then choose the iso file
- Set type to the USB drive and select your Pendrive under the drive option
- Hit OK and to start the booting.

Related: How to resolve the issue of USB device not recognized
7. Using YUMI – Multiboot USB Creator
YUMI is another but powerful software built by the company who has created a universal USB installer. The only difference between them that it supports multi-boot functionality.
YUMI Features:
- YUMI allows users to install multiple OS, antivirus tools and other software in a single Pendrive.
- Similar to the universal USB installer, YUMI also supports Persistent storage feature.
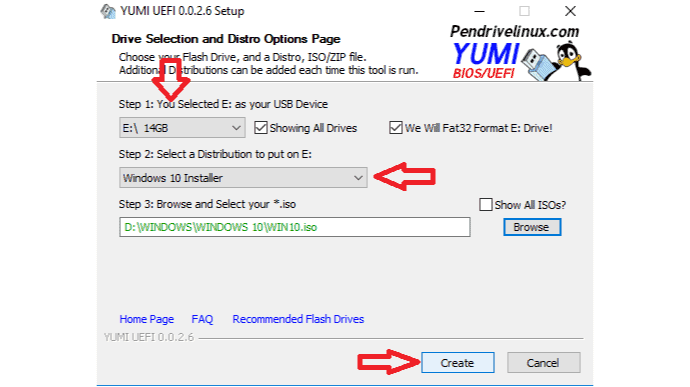
How to create a bootable USB by using YUMI?
Time took: 15 minutes
- Open up the YUMI and select your USB drive from the dropdown menu.
- Under the second dropdown menu, choose your desired operating system.
- Select the iso file by clicking on the browse button.
- Lastly, click on the create button.
Related: How to kill a virus from USB completely
8. Using Win32Disk Imager: A Free software to make a bootable USB
Win32Disk Imager is a freeware software which can create bootable USB and bootable memory card. You can write an ISO image file to USB or memory card, and you can also read the ISO image file from USB.
Win32Disk Imager Features:
- Easy booting process with minimal options.
- It is popular and oldest software in the industry similar to RUFUS
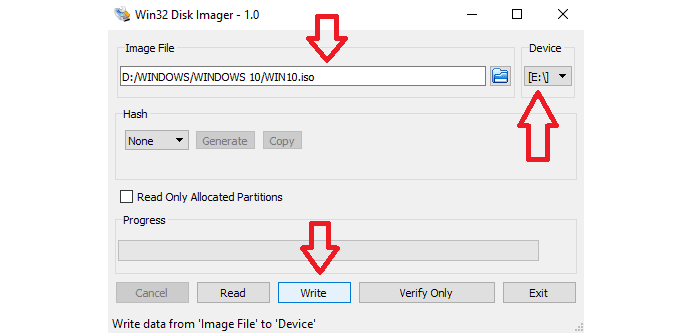
How to create a bootable Pendrive from iso by using Win32Disk Imager?
Time took: 15 minutes.
- Select image file
- Select the USB drive from the drive button
- Set value to “none” under hash option.
- Click on write to start the booting process.
How to make your Pendrive normal (Non-Bootable)?
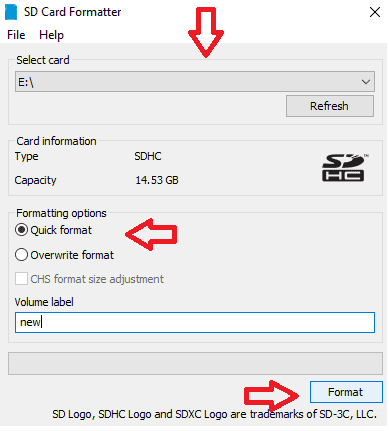
This step will be performed after you completed the booting and installation process OR in the case when you make your USB corrupted during the failed booting process. To make your USB Pendrive work normally, you must format it with the third-party tool named: SD Memory Card Formatter.
Conclusion
You made it this far that’s great. Still, confused in choosing the right USB bootable software? Then take a look at the summary section below. It will clear your head.
I recommend RUFUS!
Go for Rufus when you are in a rush to make your flash drive bootable and also when you don’t want to install third-party software on the PC. Rufus is a portable application, and it can open directly by its exe file.
Go for diskpart and cmd method only when you have enough time to get work done manually.
Go for RMPreb Pendrive USB bootable software when you don’t want to reboot your pc to check if the bootable Pendrive is working or not.
Go for WinUSB when you don’t want to lose the existed files of your Pendrive for the sake of booting process.
Go for universal USB installer, when you don’t want the trouble of unsuccessful booting attempts.
Go for UNetBootin if you are looking to install/boot a Linux based operating system on USB or when you don’t have iso image stored in your pc.
Go for YUMI USB bootable software if you want to boot multiple frameworks in a single USB drive.
Go for Win32disk imager when you want the less complicated process to make your flash drive bootable
Make bootable USB – FAQs
How do I create a bootable Windows 10 USB drive?
Creating a USB pendrive bootable on windows 10 is a simple process. To make it bootable, you have different types of method available to choose including third-party software such as Rufus, Universal USB installer, Etcher, WinUSB, YUMI, Win32Disk imager, UNetBootin & RMPrepUSB and by command prompt – diskpart.
How do I make a bootable USB from an iso?
Iso image plays a significant role during booting. To make the Pendrive bootable, you need an OS iso image file and a Pendrive bootable software to burn iso on the USB drive. There is plenty of such software’s available on the internet such as Universal USB installer, Rufus ,etc. for performing this task.
Where to download windows 10 iso image?
From this Microsoft link, you can download the Windows 10 disc image (iso file).
It is about bootable USB creator software. If you got to benefit from my article, do me a favor by sharing this article with your friends and follow us on Facebook and Twitter. Subscribe to whatVwant channel on YouTube for regular updates.