
Does your photo’s background not satisfying for you? Want to change the background for photos? It is very easy to Edit photo background with Photoshop elements. You can use the “Magic eraser tool” or “Quick selection tool” to edit photo background. Here I am showing you how to use these two tools to change the Image Background.
I am using Photoshop elements 11. I think the procedure is the same for almost all versions of Photoshop elements. When you buy Windows, you get Photoshop elements free of cost. So you need not buy Photoshop.
- You may like: How to compress image
- How to resize image without losing quality
- How to convert image to pdf
How to Edit photo background with Photoshop elements?
Video Tutorial
We provided this article in the form of video tutorial for our reader’s convenience. If you are interested in reading, watch the video after reading the article.
Method 1: Edit photo background with a magic eraser tool
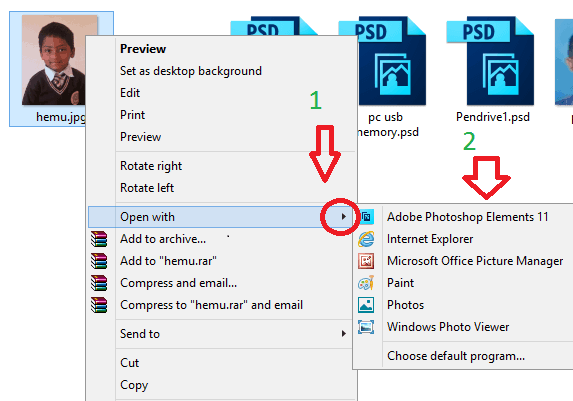
- Right-click on Photo from which you want to remove the background.
- Click on “Open with”.
- Click on “Adobe Photoshop Elements”. Shown in the below screenshot.
Now Photoshop elements opens your image as shown in the below screenshot.
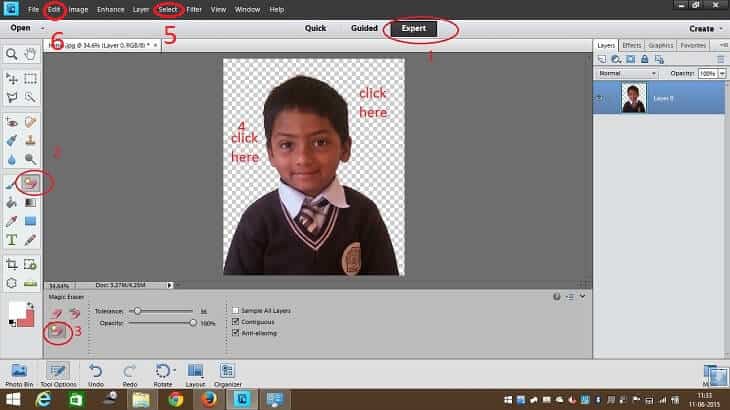
- Make sure you have selected the “Expert” option. You will see this option at the top center.
- Click on the “Eraser” tool in the left menu.
- Select the “Magic Eraser” tool.
- Just click on the background of your photo. It will make the background as transparent. If your image has a plain background. If the background has no plain background, it will leave some marks. You need to erase them with the “Eraser” tool.
- Click on “Select” in the top menu. You will see some options. Click “All”.
- Click “Edit”. You will see a list of options. Click “Copy”.
Now drag the second image which has to be a background for the first image. Drop-in Photoshop elements. You will see the second image at the second tab as shown in the below screenshot.
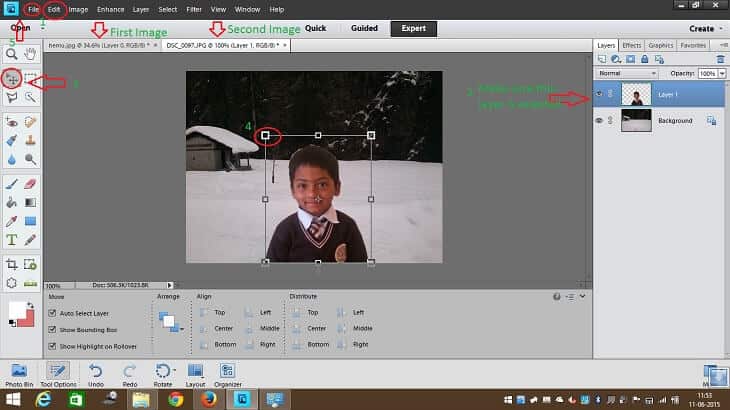
- Click “Edit” in the top menu. Click “Paste”. Now you will see the first image on the second image.
- Make sure the second image layer is selected. It is selected automatically. If not, click on that layer in the right of the window.
- Click on the Move tool in the left menu. Now your second image is selected.
- place courser in any corner of the image. Hold the left click of the mouse and drag to resize the image.
- Click “File” and click “Save”.
Now you have changed your image background. It is an easy method. If you want, you can also use a quick selection tool.
Method 2 : Edit photo background with quick selection tool
Right-click on the photo from which you want to remove the background. Open with Photoshop elements.
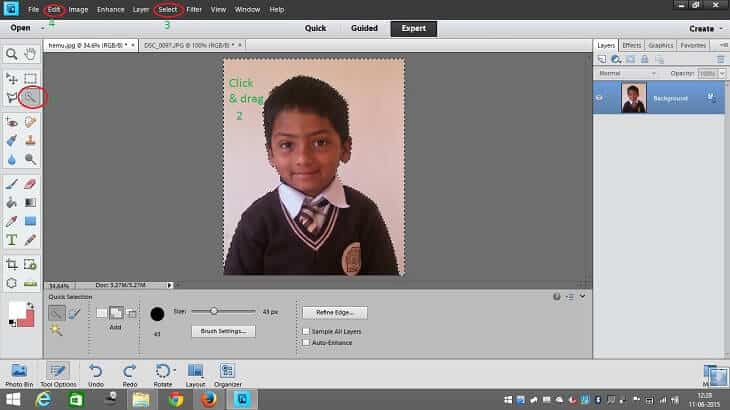
- Click on the “Quick Selection Tool” in the left menu as shown in the above screenshot.
- Click on the image background. Hold left click on mouse and drag to select the entire background. If the image background is not plain, you need some practice to do this. Otherwise, you may select the original photo. Now you have selected the background.
- Click on “Select” in the top menu. Click on “Inverse”. Now you have selected the only photo.
- Click “Edit” in the top menu. Click “Copy”.
Now drag the second image onto Photoshop elements. The rest of the procedure is the same as shown in the first method. Paste the first image on the second image. Resize the first image. You have changed the background of the photo.
Conclusion
The first method is very easy Compare to the second method. If you have practice, you can use the second method very effectively. You can edit them with many other tools such as Paint and paint 3D.
Thanks for reading my article about how to Edit photo background with Photoshop elements. If you like it, do me favor by sharing it with your friends and follow WhatVwant on Facebook and Twitter for more tips. Subscribe to whatVwant channel on YouTube for regular updates.
thank you Very much I like to Photoshop very well